Disaster recovery (DR) is the process, policies and procedures that are related to preparing for recovery or continuation of technology infrastructure which are vital to an organization after a natural or human-induced disaster. This tutorial is based on implementing a disaster recovery system for a Mysql server, which of course runs in a Linux box. You can also use this tutorial for making any of your services available a few seconds after a server failure. I am using DRBD (Distributed Replicated Block Device ) and Heartbeat for implementing this disaster recovery system. You can’t use DRBD with Windows as drbd requires some kernel additions which you can’t do with windows.
This tutorial is based on Centos 5.6. You can use other versions. DRBD is a mirroring system which replicates all data in a specified partition to another server on a network. The Replication occurs continuously while the applications modify the data in the partition.
Install centos 5.6 in two machines.
Create a partition with same size in both machines; here it is /dev/sda3
Do not mount the partition now.
Run the below command to wipe disk with zeros.
dd if=/dev/zero of= /dev/sdb1 bs=1M count=50
Create a mount point /var/lib/mysql
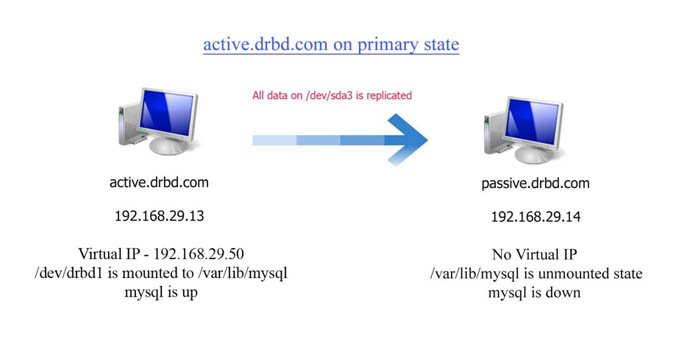
Set name of the first machine active.drbd.com ip 192.168.29.13
Second machine passive.drbd.com with ip 192.168.29.14
We are going to assign a virtual IP, which is going to be used with heartbeat. The virtual IP we are using here is 192.168.29.50
Set hosts entry on both machines for the two ips.
Enable centos extras repository.
http://mirror.centos.org/centos/5/extras/x86_64/RPMS/
install drbd 8.3 with the the following command
yum install drbd83
DRBD also have a kernel module
yum install kmod-drbd83
restart machine.
Confirm these two are installed and the kernel module is loaded by running the following command.
cat /proc/modules | grep drbd
Edit /etc/drbd.conf
################################################################################
#
# please have a look at the example configuration file in
# /usr/share/doc/drbd83/drbd.conf
#
global {
usage-count no;
}
common {
protocol C;
handlers {
outdate-peer “/usr/lib/heartbeat/drbd-peer-outdater”;
}}

resource r0 {
on active.drbd.com {
device /dev/drbd1;
disk /dev/sda3;
address 192.168.29.13:7789;
meta-disk internal;

}
on passive.drbd.com {
device /dev/drbd1;
disk /dev/sda3;
address 192.168.29.14:7789;
meta-disk internal;
}
disk {
fencing resource-only;
}
}
##########################################################################
The drbd.conf file should be the same in both the machines.
Replace the /etc/drbd.conf in the passive.drbd.com with this file.
Create device metadata. This step must be completed only on initial device creation. It initializes DRBD’s metadata:
drbdadm create-md r0
drbdadm attach r0
drbdadm syncer r0
drbdadm connect r0
drbd status file /proc/drbd
These steps must be done in both the machines.
Run the following command to start the initial synchronization. Run this command only in the active server.
drbdadm — –overwrite-data-of-peer primary r0
check status by cat /proc/drbd
mkfs.ext3 /dev/drbd1
The default directory of mysql is /var/lib/mysql
Mount the /dev/drbd1 to /var/lib/mysql directory in active.drbd.com
Install mysql in active machine and create the database .
Install mysql in passive.drbd.com
Keep the secondary unmounted all the time.
Reload drbd configuration
drbdadm adjust all
Now check the drbd status by running service drbd status. If it is working properly and the disk is properly mounted, create a file in the mounted /var/lib/mysql directory. Then we need to make the passive.drbd.com primary . Run the following command in passive.drbd.com.
drbdadm primary r0
now mount the partition in passive.drbd.com
check /var/lib/mysql and confirm the file you created is there.
Now we finished working with drbd. We are now going to integrate heartbeat with drbd.
Install heartbeat by running “yum install heartbeat”
As we are using dopd-peer-outdater as fence-peer program. If you use that mechanism the dopd heartbeat plug-in program needs to be able to call drbdsetup and drbdmeta with root privileges.
U need to fix this with the following commands.
Chgrp haclient /sbin/drbdsetup
Chmod o-x /sbin/drbdsetup
Chmod u+s /sbin/drbdsetup
Chgrp haclient /sbin/drbdmeta
Chmod o-x /sbin/drbdmeta
Chmod u+s /sbin/drbdmeta
DRBD configuration files are located in /etc/ha.d
There are mainly three configuration files for heartbeat.
The /etc/ha.d/ha.cf is the main configuration file of heartbeat.
/etc/ha.d/haresources contains the list of resources to be managed within the cluster .
The /etc/ha.d/authkeys file contains the security information for the cluster.
Change permission of the authkeys file
Chmod 600 authkeys
The ha.cf file
logfacility local0
keepalive 500ms
deadtime 10
warntime 5
initdead 30
node active.drbd.com
node passive.drbd.com
ucast eth0 192.168.29.13
ucast eth0 192.168.29.14
auto_failback on
respawn hacluster /usr/lib64/heartbeat/dopd
apiauth dopd gid=haclient uid=hacluster
ping 192.168.29.1 // Gateway
respawn hacluster /usr/lib64/heartbeat/ipfail
The haresources file is shown below
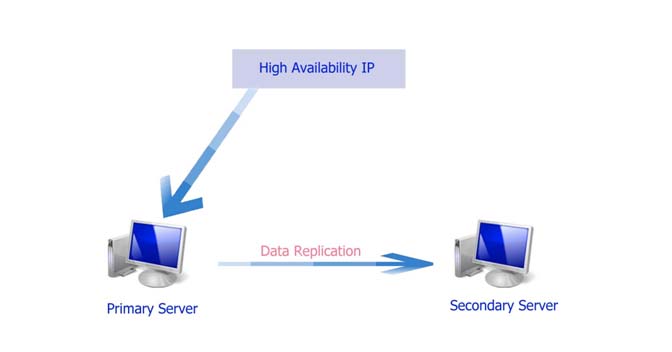
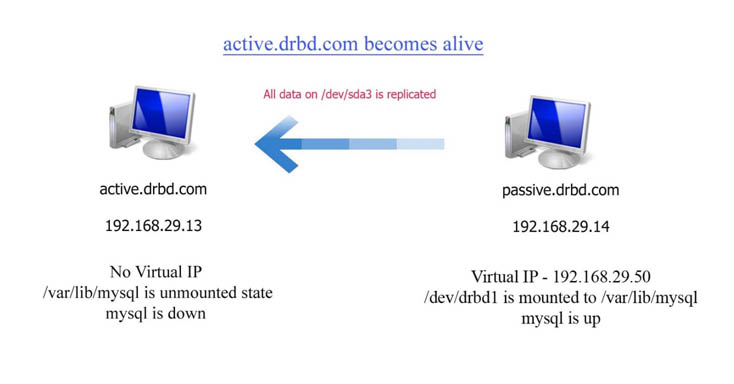
192.168.29.50 will be the ip of the active machine. We can point the database to this ip. As this is a virtually managed ip by heartbeat, this ip is assigned to both the machine. active.drbd.com will be the default primary machine. When active.drbd.com fails, the passive.drbd.com becomes the primary machine and 192.168.29.50 will be assigned to this machine and partition will be mounted automatically. Later when active.drbd.com becomes available in the network and all data in passive.drbd.com is replicated to the active.drbd.com, active.drbd.com switches to primary automatically.
active.drbd.com drbddisk::r0 Filesystem::/dev/drbd1::/var/lib/mysql::ext3 mysqld 192.168.29.50
We need to create a soft link of the file mysqld in the folder /etc/ha.d/resource.d/
The mysqld file is located in the installation directory of mysql.
Next is the authkeys file .
auth 1
1 sha1 linuxisfreedom
“linuxisfreedom” is the key we are using here. You can use any combination as key.
Start heartbeat by service heartbeat start.
You can find the log of Heartbeat in /var/log/messages
Restart the machine . Check the mysql is running and partition is mounted in active machine only.
You can check the manual failover by running /usr/lib64/heartbeat/hb_takeover in passive.drbd.com

You can test other conditions also. Try things like shutdown primary machine, remove network cable etc.
Try the below command in passive machine when you are testing.
tail –f /var/log/messages