PSCP is a command line application which is a free implementation of scp for win 32 platform . This tool is used for securely copying between computer systems. It uses the SSH (secure shell) protocol, which makes it impossible for other people on the network to snoop on your password or on the data you are transferring.
PSCP can run from the command line and has many options, which you can see via the –h option:
C:\>pscp -h
PuTTY Secure Copy client
Release 0.53b
Usage: pscp [options] [user@]host:source target
pscp [options] source [source...] [user@]host:target
pscp [options] -ls user@host:filespec
Options:
-p preserve file attributes
-q quiet, don’t show statistics
-r copy directories recursively
-v show verbose messages
-load sessname Load settings from saved session
-P port connect to specified port
-l user connect with specified username
-pw passw login with specified password
-1 -2 force use of particular SSH protocol version
-C enable compression
-i key private key file for authentication
-batch disable all interactive prompts
-unsafe allow server-side wildcards (DANGEROUS)
Here is a basic example of an user using PSCP to connect from Windows client to Linux server for transferring data to a specified path.
C:\>pscp -pw <password> -r -p <path of the file> [email protected]:<path file to stored>
C:\>pscp -pw test -r -p "c:\New Folder\test.txt" [email protected]:/home/sandeep/
In the above mentioned as we are providing the password its not a secure way of transferring file. Here comes the use of authenticating with RSA keys.
Download PuTTygen and PSCP from here
Public Key Authentication With PSCP
Preliminary Setup
Setting up public key authentication to access a particular remote host is a one-time procedure. We will require PuTTYgen for this process.
Steps for Authentication using RSA
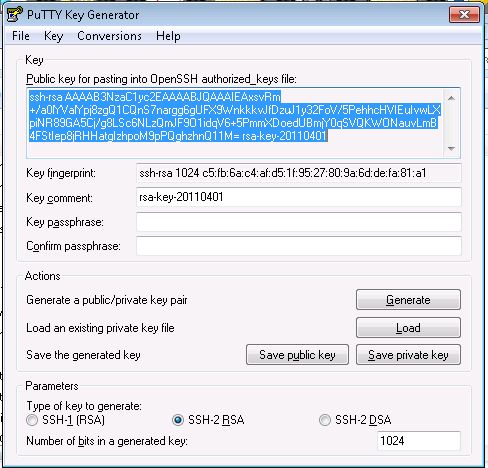
Download PuTTYgen on your Windows client machine and Generate a public/private key pair on the same.
Click the Generate button. You will be prompted to move the mouse over the blank area to generate some randomness. Do so. Shortly thereafter, the program will generate the key and display the result
Select all of the text in the box labeled “Public key for pasting into OpenSSH authorized_keys file” (near the top of the window) by dragging the cursor. Right-click over the selection and choose Copy. Finally, click the “Save private key” button to save the private key to a file , lets save it as key.ppk
Install the public key on the remote host (here Linux Server) to which you want to connect. Paste the public key from the Clipboard into the the authorized_keys file of the , which is located in the .ssh directory in your home directory on the remote host( If no such file is there we will have to manually create it). Figure 3 shows the vi editor being used for this purpose.
Repeat this procedure to install the same public key on as many additional remote hosts as you like.
Now to transfer files with basic public key authentication for file transfers with pscp.exe, use the -i flag on the command line and specify key.ppk as the flag’s argument
C:\>pscp -i <private key> <path of the file> [email protected]:<path file to stored>
C:\>pscp -i "c:\New Folder\key.ppk" "c:\sandeep\test.txt" [email protected]:/home/sandeep/
 Binbert Technology | Computer | Security | Networking | Mobile


